|
 
1.
Explore the light. Learn to
read where the light is coming from by looking at shadows -
notice if the shadows are hard-edged or soft-edged. A
general rule for beautiful images is to plan your photo
shoot for early morning or late afternoon light because
softer shadows equate to less contrast in your scene and
more flattering light for your subject. If you must shoot
images at high noon, move your subject under the shade of a
tree or building.
2.
Mix
it up! Change your angle and distance from your subject when
taking the photo. Viewing images taken from the same
distance and angle becomes dull and boring. With children,
get down on their level and don’t be afraid to zoom in close
to capture every detail.
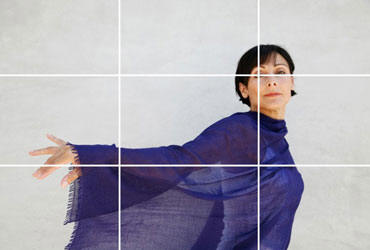
3.
Use the rule of
thirds and move your subject over to the side of the frame.
Placing people right in the middle of the frame is great for
the perfunctory passport and driver’s license photo, but
unless other interesting compositional elements are present,
it’s not an exciting image. Think of the scene in your
viewfinder or on your LCD display as a tic-tac-toe board and
mentally divide the image into thirds, and place something
of interest at one or more of the intersections.
 4. Keep
it real. Don’t force a child to strike a pose or force a
smile. A compelling photograph captures an authentic moment,
a look, or a gesture that elicits a feeling from the viewer.
Motivate kids to move around and photograph them from a
variety of angles. Choose a location for your shoot, then
encourage play, action, and activity. Be silly and have fun. 4. Keep
it real. Don’t force a child to strike a pose or force a
smile. A compelling photograph captures an authentic moment,
a look, or a gesture that elicits a feeling from the viewer.
Motivate kids to move around and photograph them from a
variety of angles. Choose a location for your shoot, then
encourage play, action, and activity. Be silly and have fun.
5. Mode
Dial - Get creative and choose a customized Mode Dial
setting! The Basic Zone Modes (icons) automatically choose
the exposure settings for your selected scene. The Creative
Zone Modes (P, TV, AV, M) can give you full or partial
creative control over your exposure settings.
6. Daytime
is a good time to use your on-camera flash. You can fill in
dark shadows across faces created by harsh overhead sun, and
illuminate your subject when they’re positioned in front of
a bright background.
 7. Get
closer than normal by using the macro mode on your camera.
The flower icon button activates the macro mode and enables
you to focus closer to your subject and capture details in
your images that were previously too small or out of focus.
Just because macro mode is represented by a flower doesn’t
mean that flowers are the only allowable subject. Get
creative with a few of the following macro photo ideas: 7. Get
closer than normal by using the macro mode on your camera.
The flower icon button activates the macro mode and enables
you to focus closer to your subject and capture details in
your images that were previously too small or out of focus.
Just because macro mode is represented by a flower doesn’t
mean that flowers are the only allowable subject. Get
creative with a few of the following macro photo ideas:
8.
Control the
light. Create a more attractive image by bouncing or
diffusing the available light. Bouncing light brightens up
faces, gets rid of shadows and creates a catch-light in your
subject’s eyes. Diffusing the light softens harsh light
falling upon your subject. You can buy a reflector or
diffuser at a camera store, but you can also use common
household items. Aluminum foil wrapped around a baking
sheet, a car dashboard reflector, or a white foam core board
can be used to reflect light. Translucent fabric, sheer
shower curtains, or plastic bags can be used to diffuse the
light.
9.
Give yourself
ROOM to ZOOM. To eliminate distracting elements and provide
a flattering perspective – stand back and give yourself room
to zoom into your subject and fill the frame.
10.
Think
about using color to create a compelling image. From vibrant
contrasts of primary colors to the Zen-like mood of
harmonious blues and greens, color can determine the
emotional content of a photograph. |